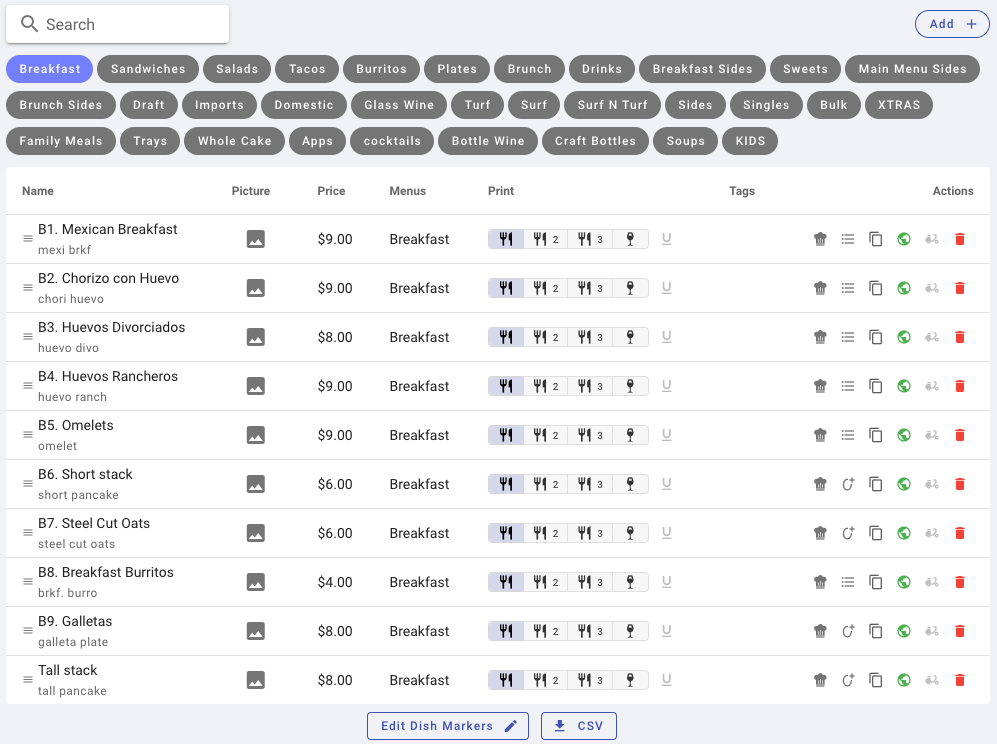
Dishes
The 3rd tier of the menu system
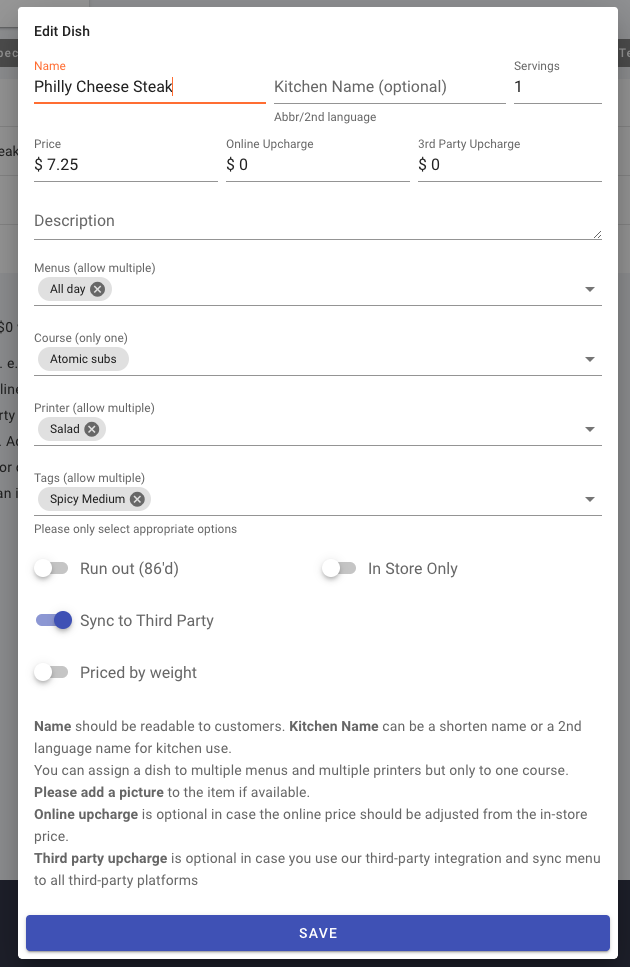
Name Item name
Kitchen Name [optional] Item kitchen name. It can be a shortened name or a name in different language (e.g., spanish, chinese, vietnamese).
Price The base price for the dish. Extra cost can be set in modifiers.
Online Upcharge [optional] In case the online price should be greater than the in-store price.
3rd Party Upcharge [optional] In case the 3rd party price should be greater than the in-store price.
Description [optional] A brief description of the dish
Menu Assign to one or more menus.
Course Assign to one course.
Printer Assign to one or more printers. e.g., an item can be sent to both fry and soup stations.
Tags Assign with one or more tags. e.g., spicy level, gluten free, vegan.
Run Out (86'd) Turn off the item
In-store only Control the online offering of the item
Sync to Third Party Sync this item to your third party online platforms. It is only available to clients integrated with Chowly.
Priced by weight Priced by weight. Allowed units are pound, ounce, kilogram, gram.
Creating Dishes
To create a dish, click on Add located in the upper right corner of the screen.
- Name the dish – The dish will appear on the Online menu as it is here, it should be understandable to customers. Kitchen Name can be a shortened name or a second language name for kitchen use.
- Price - The base price for the dish. Extra cost can be set in modifiers.
- Select the menu and course that the dish belongs to.
- Printer - Assign one or more printers. (e.g., an item can be sent to both fry and soup stations.)
- Kitchen 1
- Kitchen 2
- Kitchen 3
- Bar Printer
- Label Printer
When the initial Dishes have been created, each dish can be further defined.
Sorting dishes
To sort the dishes (When sort alphabetically is turned off).
- Click
dash barand hold exactly right of the dish’s name, to move it to the desired location (This is not available on tablets, phones, or mac book/google book).
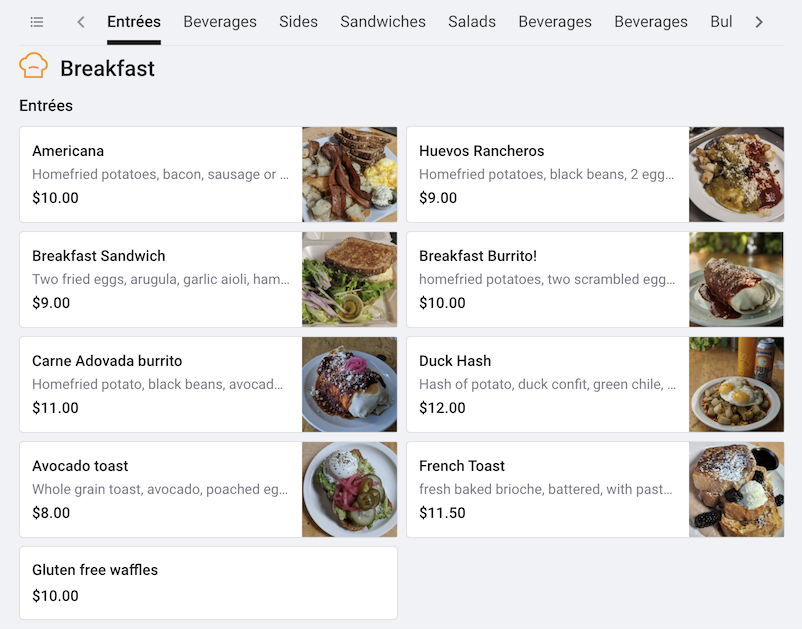
Adding Pictures
Pictures often play an important complementary part in your menu. They not only assist your customers in navigating menus faster but also help your staff in the same way. Upload clean and clear pictures to your menu and make it a better representation for your business.
- The dish picture must be on the computer used to program.
- Click
imageicon to the right of the dish’s name. An edited picture screen will pop up.- Click “Choose an image” in the Edit picture box.
- Browse the computer for the Picture.
- Click on the picture file then choose Open.
- Click
Save
Print Groups
When the dishes are assigned to a print group, they will print at the top of the kitchen ticket printed at that printer eliminating the need for the cooks to scan the entire ticket.
- To program Print groups click on
Printing Group. - Click on
+ Item. Name the group and assign it to a kitchen printer. - When all print groups have been assigned, Click
Save. - To assign a dish to a Print Group Click
drop downicon, choose the print group.
Underlining Dish
To underline the modifiers for a dish to allow them to stand out click U button.
Dish Tags
These tags allow you to notify the customer of the spice level, Gluten free, and Vegan.
- Click on the dish to edit. Click on the dropdown menu on “Tags (allow multiple)” and check the tags that apply and click
Save.
Dish Recipe
If tracking of the raw materials is required, you must first create the raw ingredient database.
- Click on “Ingredients” in the upper right corner of the Menu screen.
- To add the raw Ingredients, click on
+ Add. - Name the Raw ingredient you wish to track, the unit of measurement you want to use (oz, pound, each etc....), and cost per that measurement.
- Click
Saveafter each ingredient. - When all ingredients are entered, Click on “Dishes” at the top of the screen.
- Click on the Course where the dish resides, then click on
checkicon on the right side of the course screen.- Search for each of the raw ingredients for that dish by typing a few of the letters of it.
- Click on the ingredient, enter the quantity needed for that dish. Do this for each of the ingredients to track.
- The placement of the ingredients can be sorted by right clicking on to the left of each ingredient, while holding the right mouse button slide it to the position you prefer.
- To delete an ingredient, click
trash. - Once all ingredients are complete click
Savein the upper right of the edit ingredients screen.
Add/Edit Modifiers
- To add or edit a modifier click to the right of the recipe icon.
- To search for an existing modifier, click
search to add modifiers. And type a few letters of the needed modifier. Once located click toaddadd it to the dish. - To create a new modifier, click
create modifier. The “Create Modifier” screen will pop up.- Title the Modifier
- Enter the max number to select, If the modifier has multiple choices, (for example “comes with Two sides”) define the number of choices using the drop-down menu under “Max Selections”.
- check the required box if the modifier is mandatory.
- Select the dishes to apply the modifier too by typing a few letters of the dish on the “Apply To” line.
- Type in the options for the modifier on the “Choices” line. Separate each choice with a comma, tap the “TAB” key on the keyboard.
- If you prefer to have a different name printed on the Kitchen printer (or Kitchen Display) type that choice on the “Kit Name” line.
- If the modifier has an up charge enter it on the “Ext Price” line. This price will be added to the dish’s price.
- You can have a default choice by checking the “Default” box.
- To allow multiple selections of the same modifier choice define the max number of choices using the drop-down menu under “Maximum”.
- To allow Sub Choices to a modifier option click . Type in the options for the Sub modifier on the “Option” line. Separate each choice with a comma, tap the “TAB” key on the keyboard.
- Use sub choices for nested choices such as pizza toppings, combo choices, etc.
- You now have more options for the modifier choices.
- Max Sub-choices, Free sub-choices, Tear 1 pricing, Tier 2 Pricing, and hide sub-choices to the options that sub-choices do not apply.
- To allow Extra Quantity, slide the toggle to the on position.
- To allow half & Half, slide the toggle to the on position.
Using Duplicate to Create Dish
To duplicate and add an item quickly with similar settings click copy button.
- Rename the dish (Selflane does not allow duplicate names).
- Make the changes necessary on the new dish.
Online Visibility
The online visibility of items is influenced by several factors:
Online Status: Items marked as available for online ordering will be visible to customers browsing the online menu.
Out of Order (86'ed) Status: If an item is temporarily unavailable or out of stock (86'ed), it will not be visible for online ordering until it becomes available again.
Price: Items will only be visible online if they have a price greater than zero. Additionally, if an item requires modifiers, those modifiers must also have prices greater than zero for the item to be visible. Essentially, free items will not be displayed online.
By considering these factors, the system ensures that only relevant and available items with appropriate pricing are visible to customers when browsing the online menu.
Other Settings
- To make the dish available online click Green Available online, Grey not available online.
- To make the dish available to third party menus click Green Available third party, Grey not available third party.
- Delete the dish click .
Dish Markers
Dish Markers are notes to the kitchen, no price will be assigned to it, and it will not be shown on the customer’s guest copy. To add or delete Dish markers Click on Edit Dish Marker located below each list of the dishes.
- Name the dish marker.
- Kitchen Name [optional] Item kitchen name. It can be a shortened name or a name in different language (e.g., Spanish, Chinese, Vietnamese etc.…)
- To delete a dish marker, click on the red “X”.
- To add a dish marker, click in the top right of the box.
- When complete click
Save
Examples
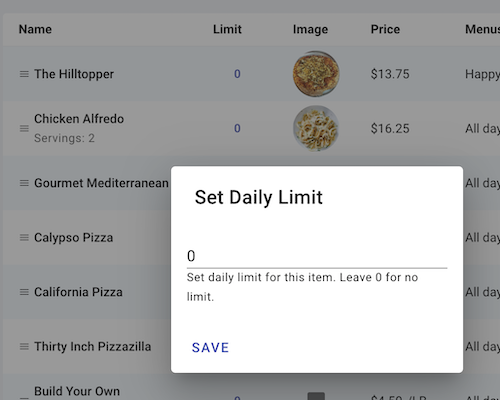
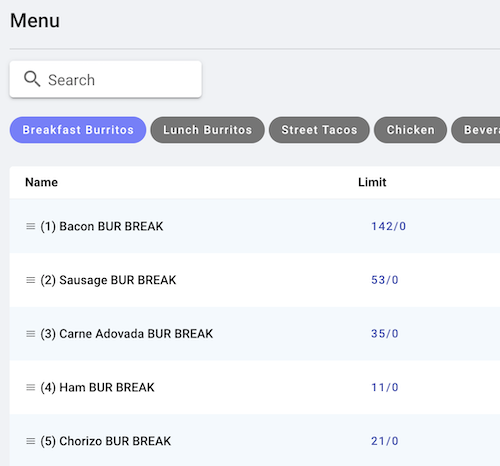
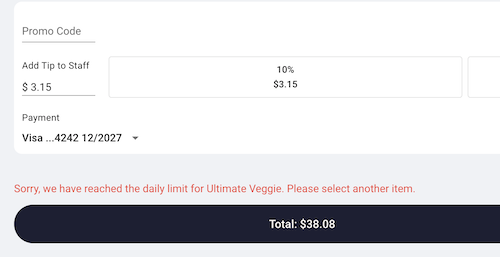
Daily Item Limits
Daily Item Limits: You are now in control! Set a daily limit for each menu item. By default, the daily limit is unlimited, but you have the power to tailor it to your preference.
Real-time Tracking: Stay in the loop! Our system now diligently counts each menu item when ordered online or through the Point of Sale (POS), giving you and us real-time insights.
Smart Ordering: No more disappointment! Once an item reaches its daily limit, it becomes temporarily unavailable for the day. But don't worry, you can still plan ahead - if the limit for a future date hasn't been reached, go ahead and place your order!