Display Hub
Use Display Hub to turn extra iPads into kitchen, packing, or customer-facing screens. The built-in Kitchen and Kitchen-Prep displays still open in Selflane POS. Since version 7.5.9, the POS may first offer the dedicated Selflane Displays app when you choose either kitchen role. The offer appears once per POS version.
Choose a display
| Display | Who looks at it | What it does |
|---|---|---|
| Kitchen Display | Line cooks | Show digital kitchen tickets in the built-in display or Selflane Displays app. |
| Kitchen-Prep Display | To-go packers | Track packing for every order that still has unpacked dishes, in the built-in display or Selflane Displays app. |
| Customer-Facing Display | The customer at checkout | Shows the order, lets the customer tip and sign on screen. |
| Loyalty Program Display | The customer at checkout | Lets the customer sign up for the Member Program. |
| Drive-Thru Display | A second staff station | Lets one person take the order and another collect payment, shortening the wait. |
To open Display Hub on any iPad, tap More > Display Hub. If you choose a kitchen role and see “Try the Selflane Displays app”, tap Get Selflane Displays to get the app, or Continue to open the built-in display.
Get the Selflane Displays app
In Selflane POS 8.1.0 or later, Display Hub shows a Recommended: Selflane Displays app card above the display buttons. Tap it, or tap Get Selflane Displays in the notice, to open a QR code for selflane.com/apps:
- Scan the QR code on the iPad or Android device you want to use as the kitchen screen. On SUNMI screens, install the app from the SUNMI App Store.
- To install the app on the iPad you’re holding instead, tap
Install on This Device. If the iPad can’t open the App Store, the sheet says “Couldn’t open the App Store.” Kitchen iPads often block the App Store through device management or Screen Time, so ask whoever manages the iPad to allow it. - Tap
Doneto go back.
In earlier versions, Get Selflane Displays in the notice opens the App Store.
Settings
Station identifier
If you run more than one POS station, give each one a number. The number tags every transaction and shows up in the Overall Report so you can see how each station performed. It also sets the Drive-Thru lane and filters which orders the Drive-Thru Display shows.
Set it with the Station picker in Display Hub. An iPad that shows 0 – All Stations (KDS) is on an old setting; pick a number to replace it. On a register iPad, the number also picks the cash drawer it opens, so change it between shifts, not during one. To choose which station’s orders the Kitchen Display shows, use Show Orders From.
Peer Comm. Channel
Two iPads in a Display Hub pairing must use the same business and the same Peer Comm. Channel to find each other on the network.
Kitchen Display
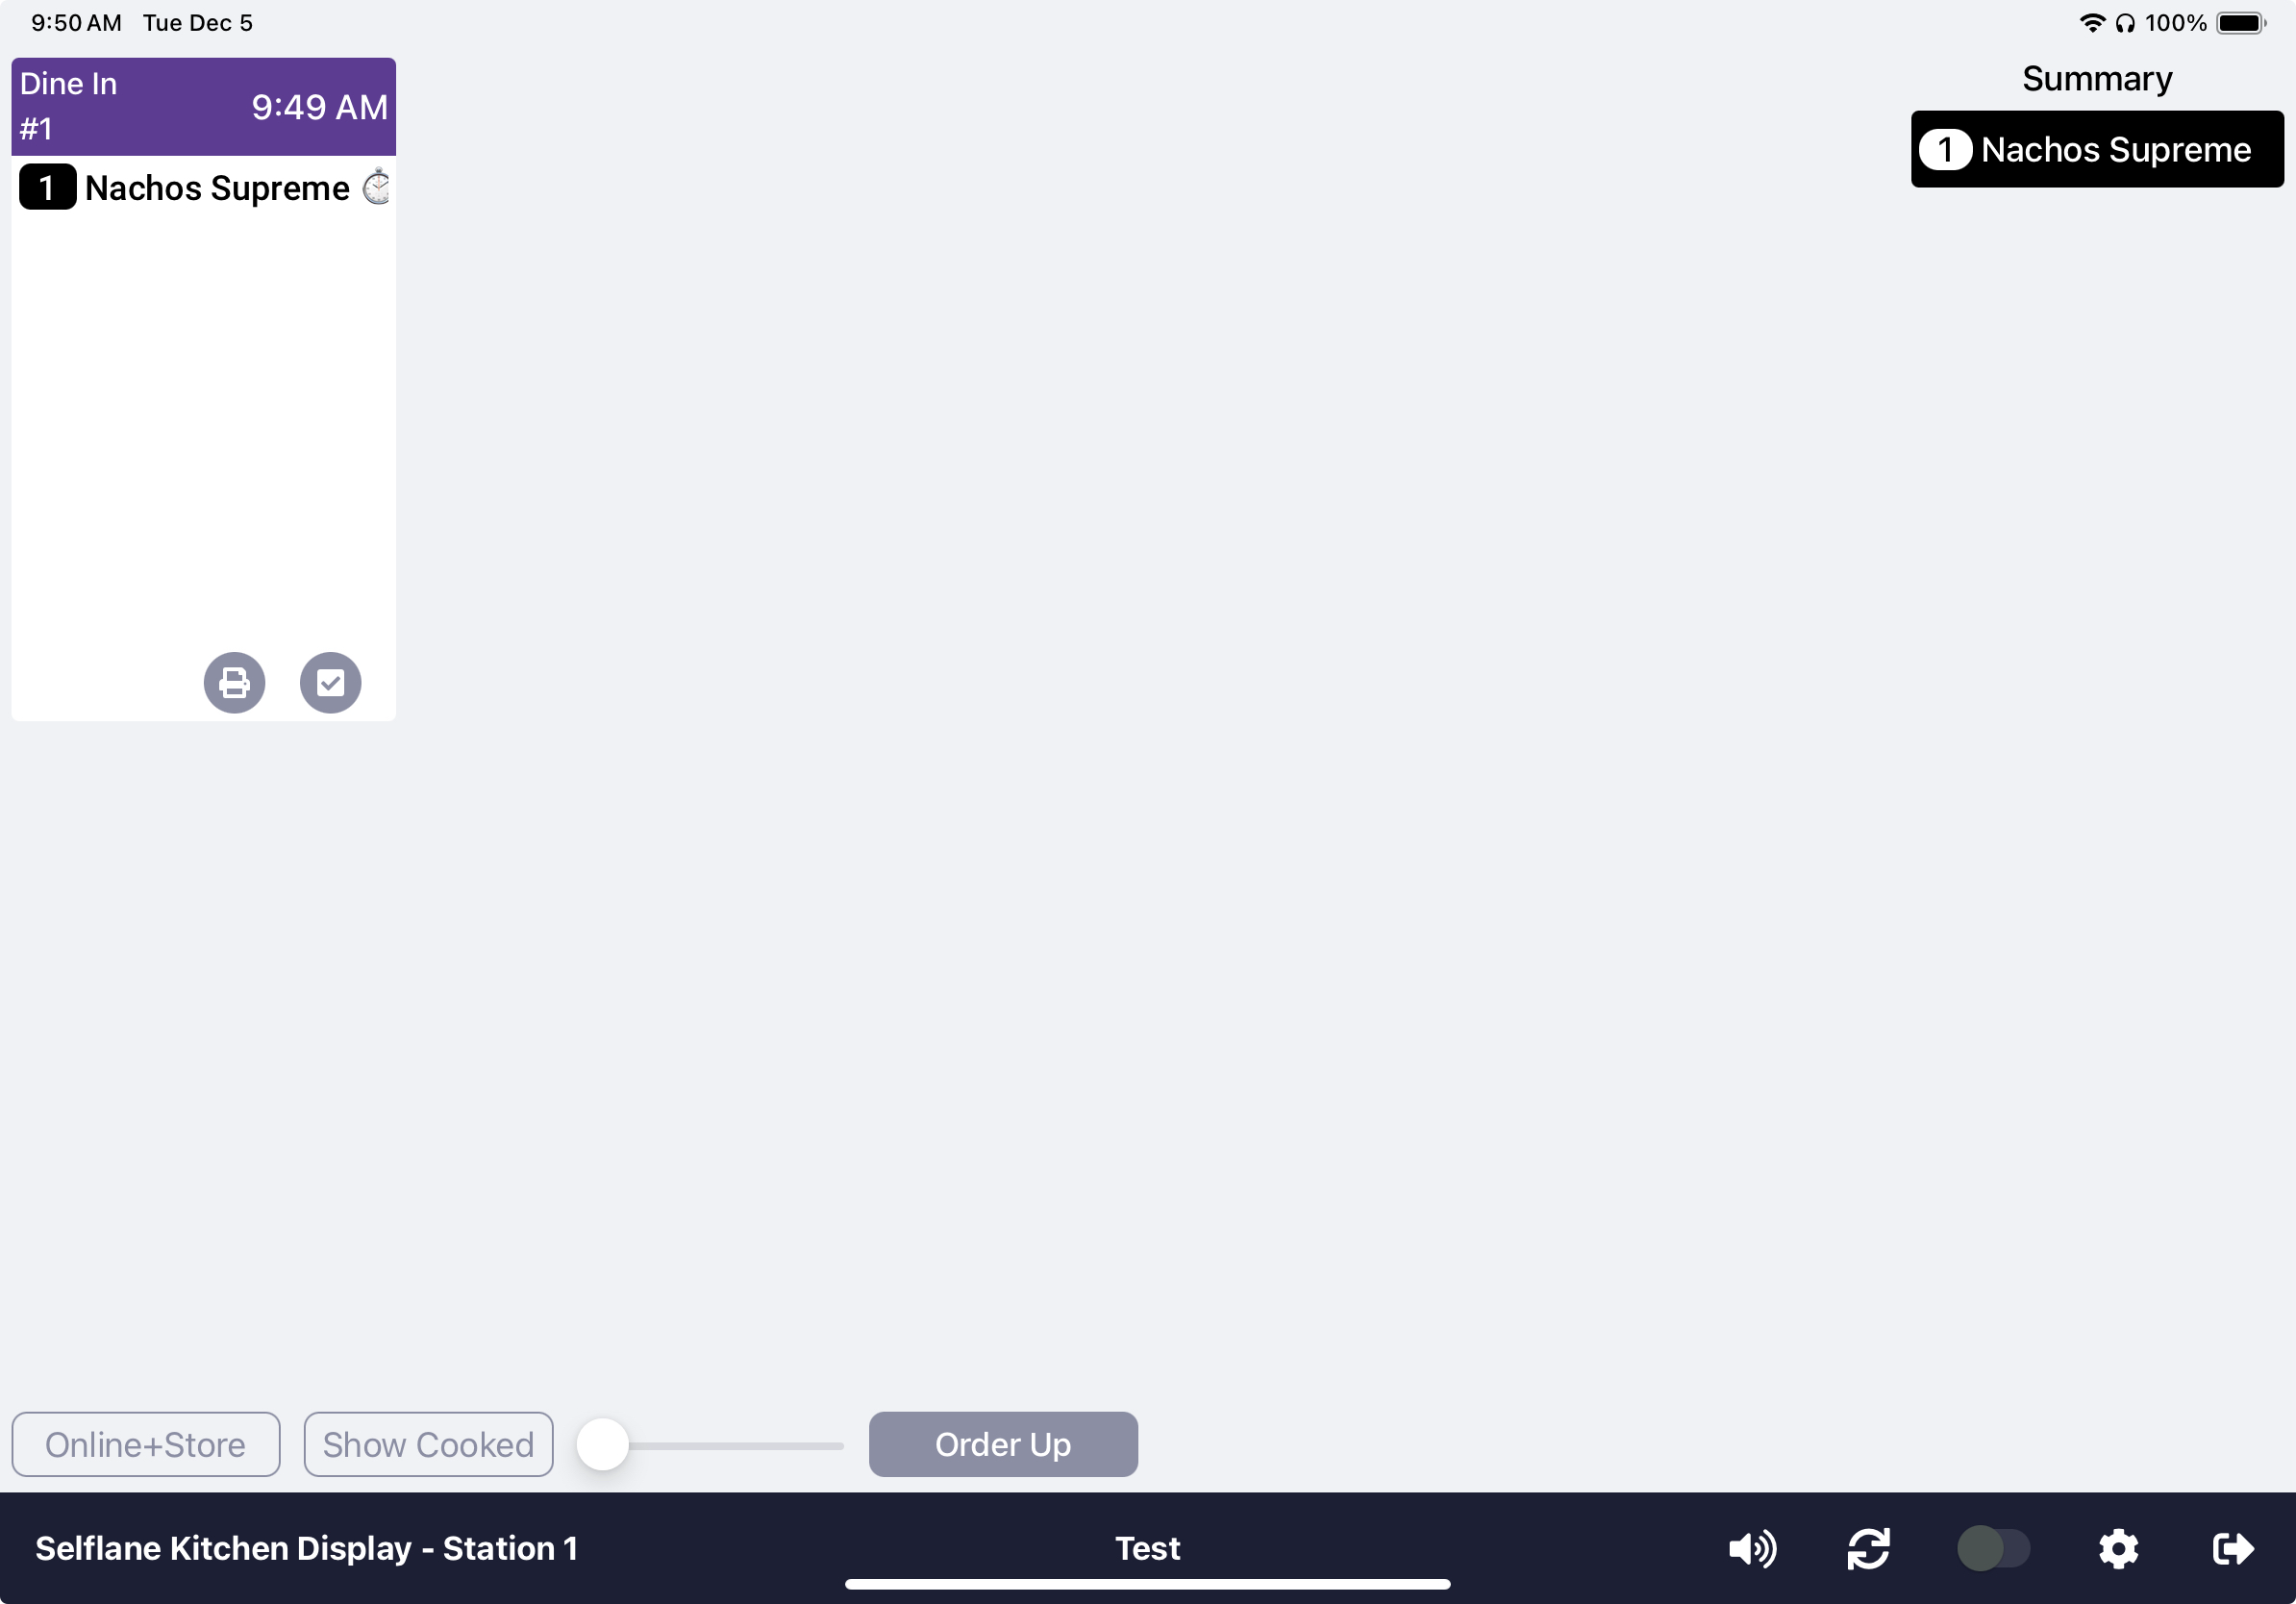
The built-in Kitchen Display replaces or supplements the kitchen printer. Orders appear as digital tickets that the line marks as cooked, so the kitchen sees the queue in real time. For the standalone app on iOS and Android, see Selflane Displays.
Set up a Kitchen Display
- On the iPad you’ll use as the display, tap
More>Display Hub. - Tap
Kitchen Display. If the Selflane Displays offer appears, tapContinue. - Tap the gear icon and choose the print targets this display covers:
Kitchen,Kitchen 2,Kitchen 3,Kitchen 4, andBar. One display can cover several targets.Kitchen,Kitchen 2, andKitchen 3are selected by default.
Day-to-day controls
Above the tickets:
Online+StoreorOnline Only- choose which orders to show.Show CookedorHide Cooked- show or hide tickets already marked done.- Width slider - change the ticket width.
Order Up- mark the dishes you selected as cooked. The button shows how many dishes are selected.
In the bottom bar:
- Sound icon - white means sound is on; red means muted.
- Sync icon - reload the latest orders if anything looks out of sync.
- Finished-orders switch - show or hide finished orders.
- Gear icon - open the display settings.
- Exit icon - tap it, then
OKat “Do you want to exit KDS?” to return to the POS.
In Selflane POS 8.1.0 or later, a Get new features in the Selflane Displays app banner sits just above the bottom bar. Tap it to open the QR code for the app. See Get the Selflane Displays app.
Settings
Show Orders From- show orders fromAll Stationsor one station only.Show Summary- turn the summary view on or off.Only Show Online Orders- hide in-store orders.- Print targets - change which kitchen stations feed this display.
Refresh All Orders- reload every order on the display.
Kitchen Display demo mode
A business that hasn’t subscribed to the Kitchen Display Module can try it for 3 minutes. The title ends in 3' Demo Mode, and the display works normally during the demo.
In Selflane POS 8.1.0 or later, when the time runs out, the Demo Ended screen covers the display. It shows a QR code for the Selflane Displays app. Scan it on the iPad or Android device you want to use as the kitchen screen, or go to selflane.com/apps. The built-in display and the Selflane Displays app both need the Kitchen Display subscription.
Subscribe- a manager signs in to approve, then your business subscribes to the Kitchen Display Module. The display shows “Subscribed” and keeps running. If an error appears instead, the subscription didn’t go through, and you can tapSubscribeagain. If your business has no manager roles, any staff member can approve. See Job Roles.Pricing- see the plans.Exit- return to the POS.
If your business subscribed in the Back Office during the demo, the Demo Ended screen closes on its own as soon as it appears, and the display keeps running.
In earlier versions, the iPad asks “Do you want to subscribe to the KDS service?” instead. OK subscribes right away, with no manager approval, and Cancel returns to the POS.
Subscribe (OK in earlier versions) starts a paid subscription that’s added to your monthly bill. If you’re only trying the display, tap Exit (Cancel in earlier versions).
Kitchen Display service ended
In Selflane POS 7.5.9 or later, if Selflane has ended your Kitchen Display service, the display shows Service Ended with “Kitchen Display has ended. Contact Selflane to resume.” There’s no demo. Tap OK to return to the POS.
Kitchen-Prep Display
Use the Kitchen-Prep Display to pack orders faster. It turns an iPad at the packing station into a board of today’s orders that still have dishes to pack, including Dine In orders. For the standalone app on iOS and Android, see Selflane Displays.
Open the display
- On the iPad at the packing station, tap
More>Display Hub. - Tap
Kitchen-Prep Display. If the Selflane Displays offer appears, tapContinue.
While the display is open, the iPad screen stays on.
Read an order card
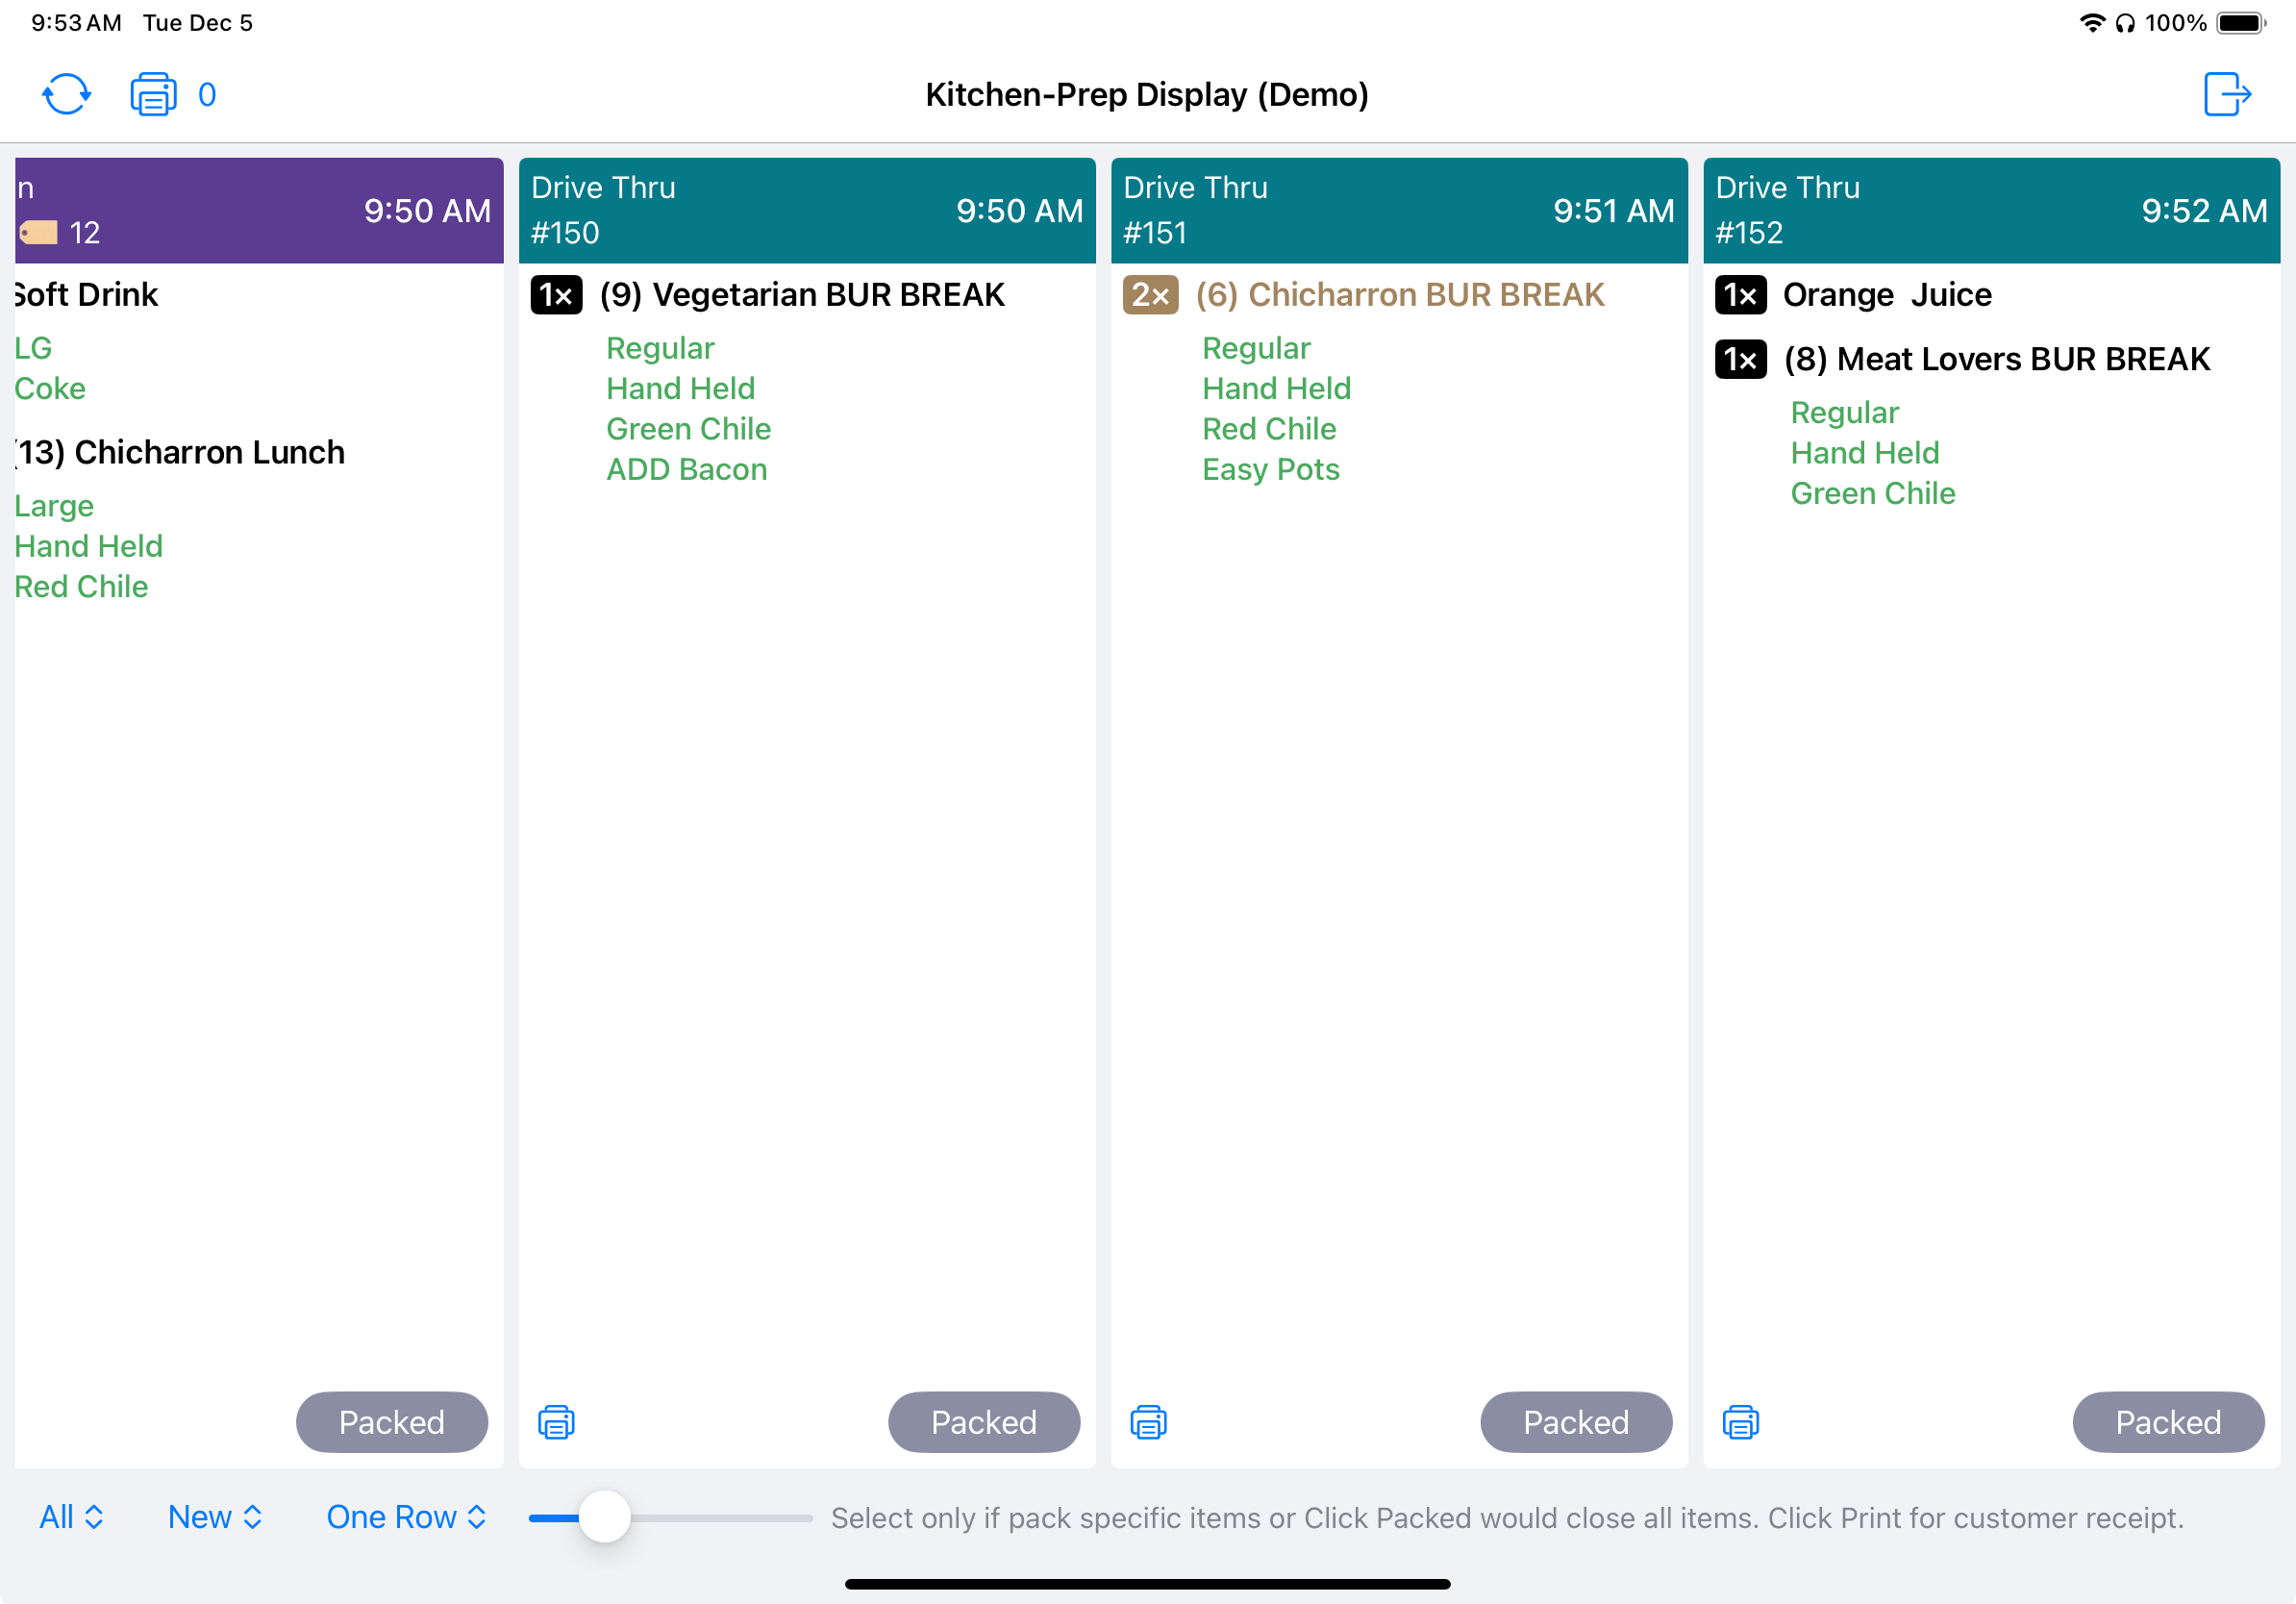
Each order is a card. Cards are sorted by ready time, earliest first.
The top of the card shows:
- For a Dine In order, the table and the server’s name. For other orders, the order type.
- The order number, the tag number if there is one, and the customer’s name.
- The ready time. For an online delivery order, this is 20 minutes before the delivery time.
- The order note, in red.
Dine In and QR code orders have a purple header. All other order types have a teal header.
Colored banners flag orders that need attention:
Running Late(red) - the order is more than 30 minutes past its ready time and still has dishes to pack.Unpaid(orange) - in Selflane POS 7.7.0 or later, a Third-Party Ordering order set to pay at the store hasn’t been paid yet.Future Order(indigo) - the ready time is more than 90 minutes away.
Below the header, each dish shows its quantity, kitchen name, modifiers in green, and the name entered for the dish, if any. The dish name color tells you its state:
- Black - one of this dish.
- Brown - more than one of this dish.
- Orange - selected for packing.
- Blue - already packed.
A purple bar on the left marks a dish that is part of a combo.
Pack an order
- To pack only some dishes, tap each one. Tap a selected dish again to clear it. You can’t select a dish that’s already packed.
- Tap
Packed.
If no dishes are selected, Packed packs every dish on the order. When every dish on an order is packed, the order is marked ready and usually moves to the Packed view. Other POS iPads pick up the change.
Packing doesn’t mark dishes cooked on the Kitchen Display.
To print the customer receipt, tap the printer icon at the bottom of the card.
Controls
Below the order cards:
AllorOnline Only- show every order, or hide orders entered on the POS. Kiosk, online, and Third-Party Ordering orders still show.NeworPacked- show orders that still have dishes to pack, or orders with every dish packed. ThePackedview lists the latest ready time first.One RoworTwo Rows- stack the cards in one or two rows. Swipe sideways to see more cards.- Width slider - change the card width.
In Selflane POS 8.1.0 or later, a Get new features in the Selflane Displays app banner sits below these controls. Tap it to open the QR code for the app. See Get the Selflane Displays app.
In the top bar:
- Sync icon - reload today’s orders.
- Printer icon with a number - open the print queue. The number is how many print jobs are waiting. An orange dot means some tickets were sent but the printer didn’t confirm them. See Check the print queue.
- Exit icon (top right) - tap it, then
Exit Kitchen-Prep Displayto return to the POS.
The display also reloads recent orders every 2 minutes. When there are no orders to show, it says “No Orders to Display”.
Kitchen-Prep demo mode
The Kitchen-Prep Display is part of the Kitchen Display subscription. A business that hasn’t subscribed sees Kitchen-Prep Display (Demo) in the title. After 2 minutes, the demo stops showing orders. In Selflane POS 8.1.0 or later, the same Demo Ended screen as the Kitchen Display appears, with the Selflane Displays QR code, Subscribe, Pricing, and Exit. In earlier versions, it offers Subscribe to the Kitchen Display Module, and you tap Pricing in Display Hub to see plans.
In demo mode, the display doesn’t reload orders every 2 minutes. In Selflane POS 8.1.0 or later, once you subscribe, the Demo Ended screen closes and the display starts reloading orders every 2 minutes.
Kitchen-Prep service ended
In Selflane POS 7.5.9 or later, if Selflane has ended your Kitchen Display service, the display shows Service Ended with “Kitchen-Prep Display has ended. Contact Selflane to resume.” Tap Exit to return to the POS.
If something goes wrong
- Tapping
Packedshows an error. This usually means the order changed or was canceled on another iPad. Tap the sync icon, check the order, then try again. - An order is missing. Check that the filters aren’t set to
Online OnlyorPacked, then tap the sync icon. Canceled orders and orders with no dishes don’t appear.
Customer-Facing Display
Let customers check their order and add a tip without handing them the POS. The Customer-Facing Display turns a second iPad toward the customer. It shows the order as you ring it up, lets the customer join the Member Program, and asks for a tip and signature after a card payment.
Set up the display
You need two iPads signed in to the same business: the POS iPad where staff take orders, and the iPad that faces the customer.
- On the POS iPad, tap
More>Display Huband pick a number inPeer Comm. Channel. - On the customer’s iPad, tap
More>Display Huband pick the same number inPeer Comm. Channel. - On the customer’s iPad, tap
Customer-Facing Display.
If you tap Customer-Facing Display while Peer Comm. Channel is None, the POS shows “Please select a Peer Communication Channel first”.
To check the connection, tap the gear icon at the bottom of the display. Front Face Display Settings lets you change Peer Comm. Channel and lists the paired iPads under Connected Peers. “No device found in the same channel.” means the two iPads haven’t found each other yet.
To leave the display, tap the exit icon at the bottom, then Exit Customer-Facing Display. A staff member with a manager role then enters their passcode to approve. If no job role has manager access in the Back Office, any active staff member can approve. See Job Roles.
What the customer sees
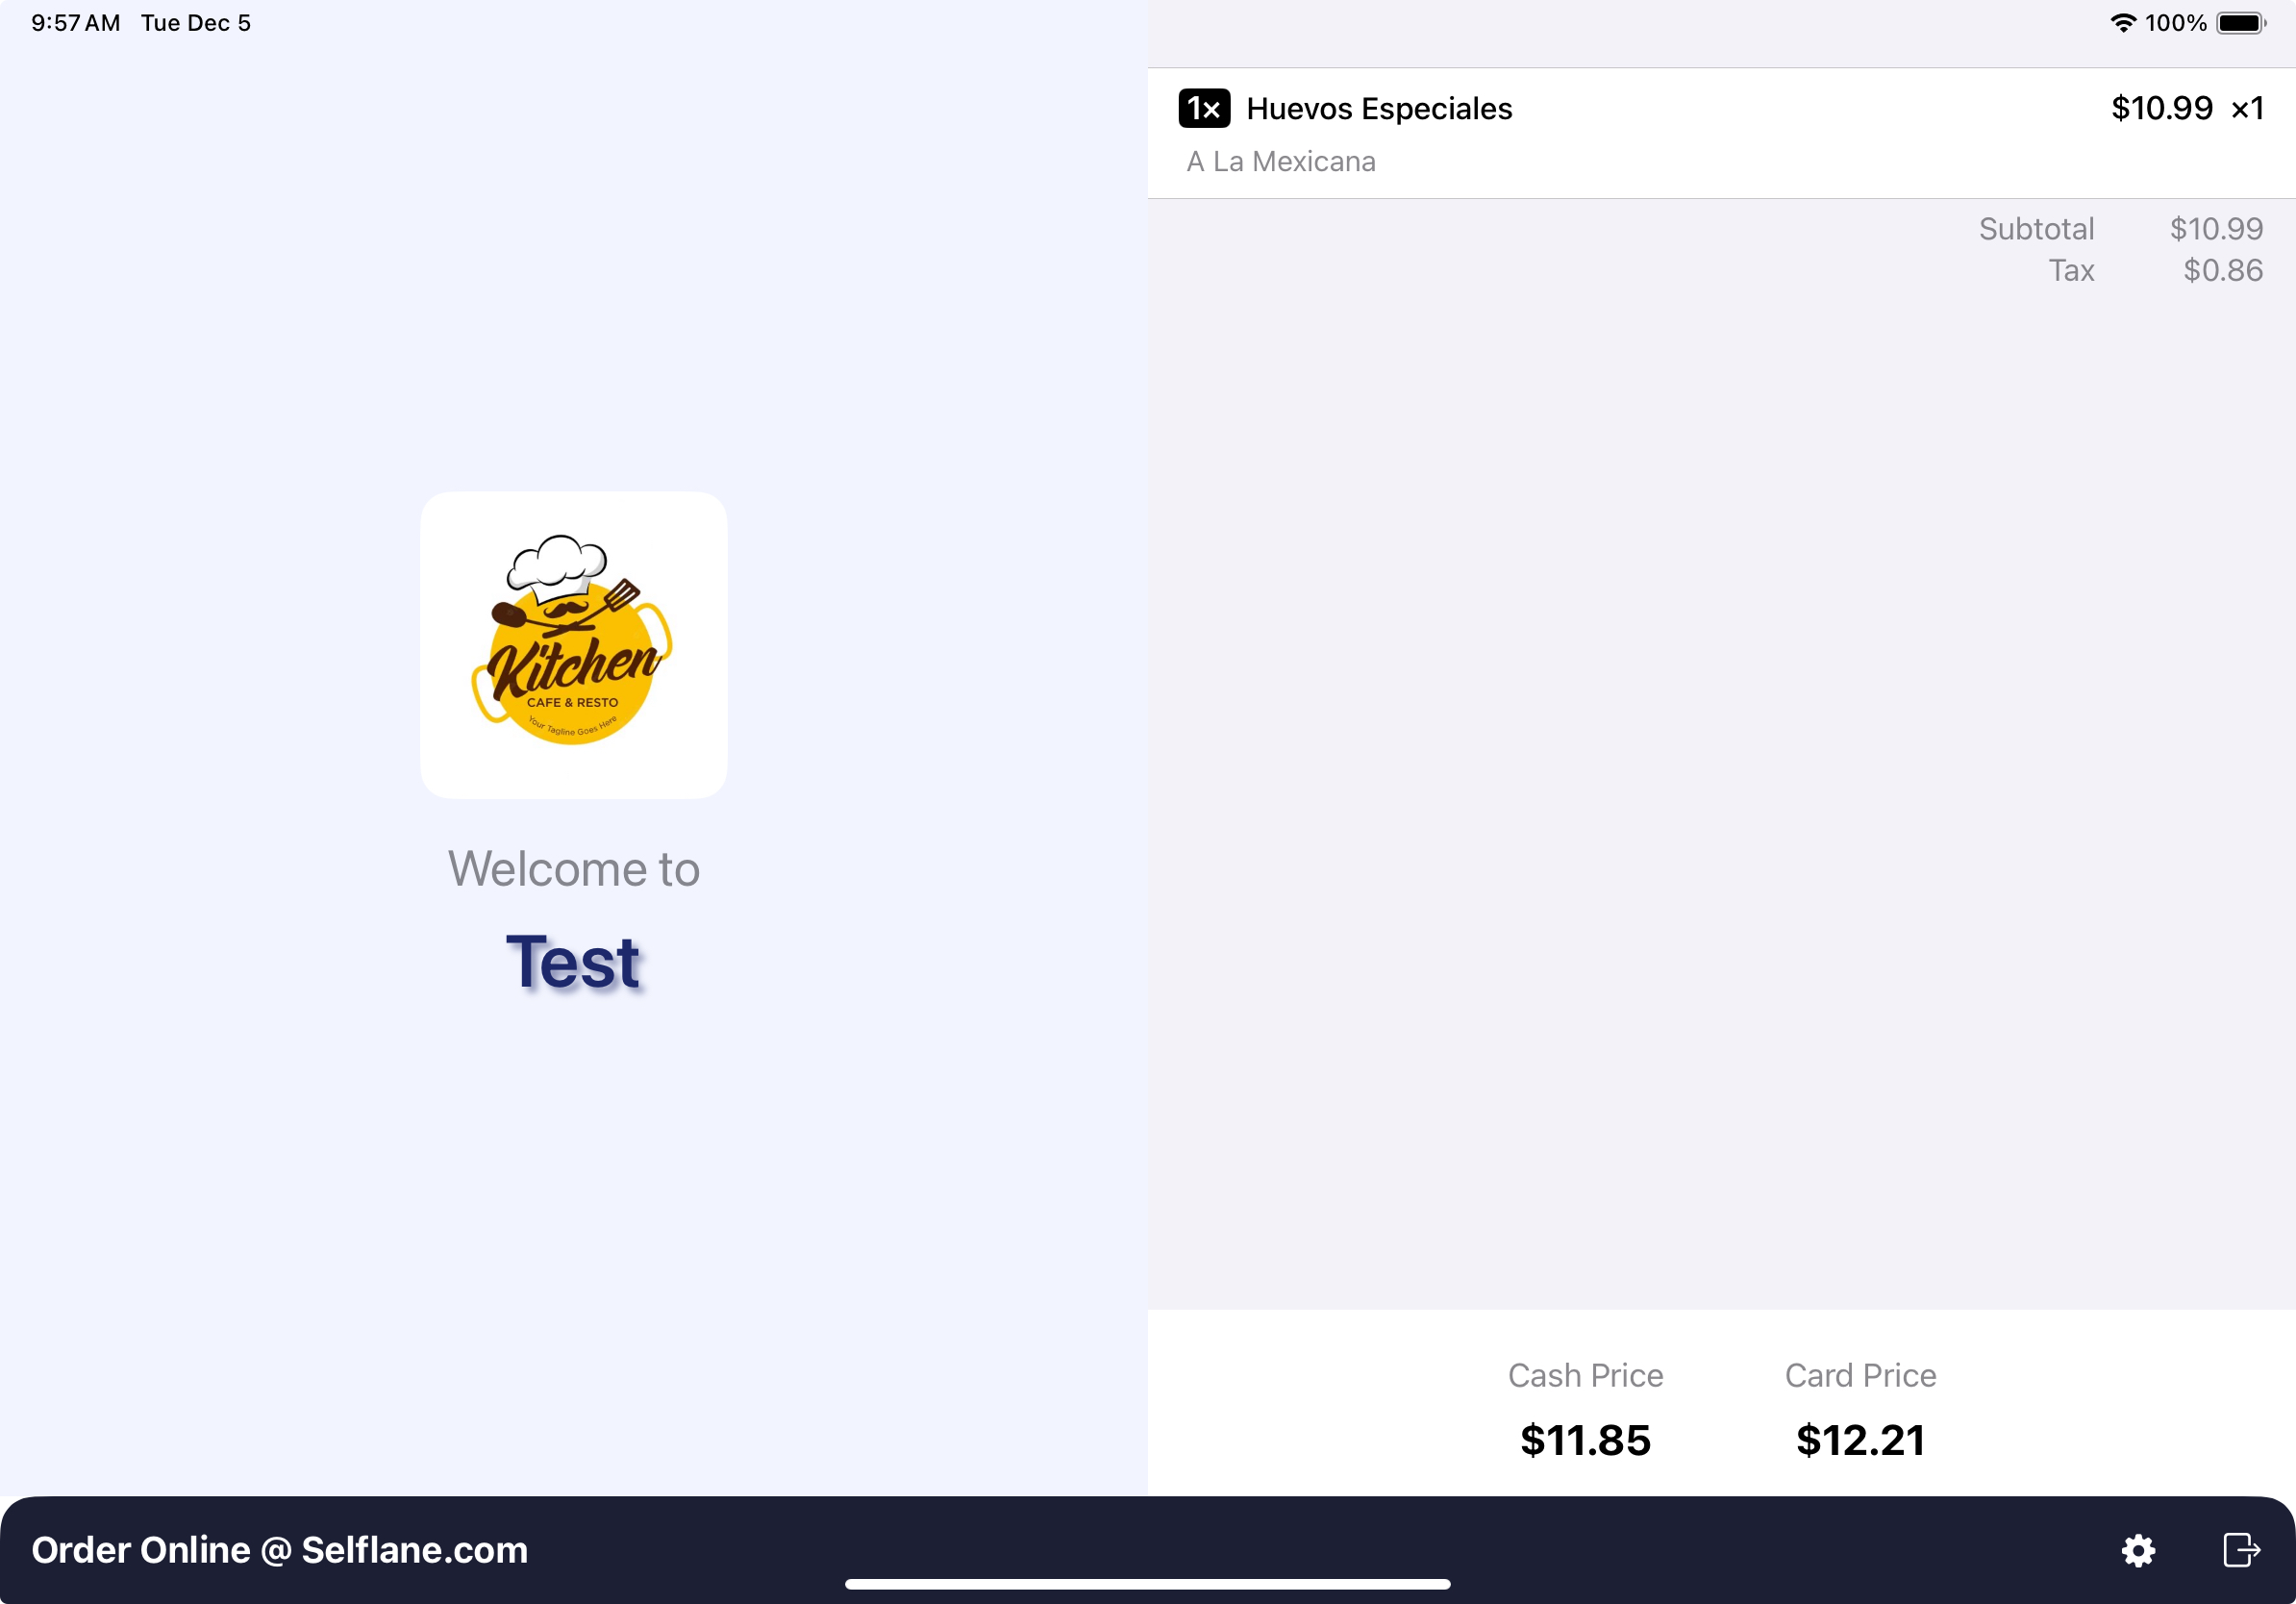
The left side shows your logo and “Welcome to” with your restaurant name. When an order is on the screen, the right side lists its items, gift cards, and vouchers with the totals.
- Before any payment, the bottom of the order shows
Total. If you run a Cash Discount program, it showsCash PriceandCard Priceinstead. - While a Stripe reader or PAX terminal waits for the card, the display shows “Please tap/insert/swipe your card. Thanks!”
Member sign-up on the display
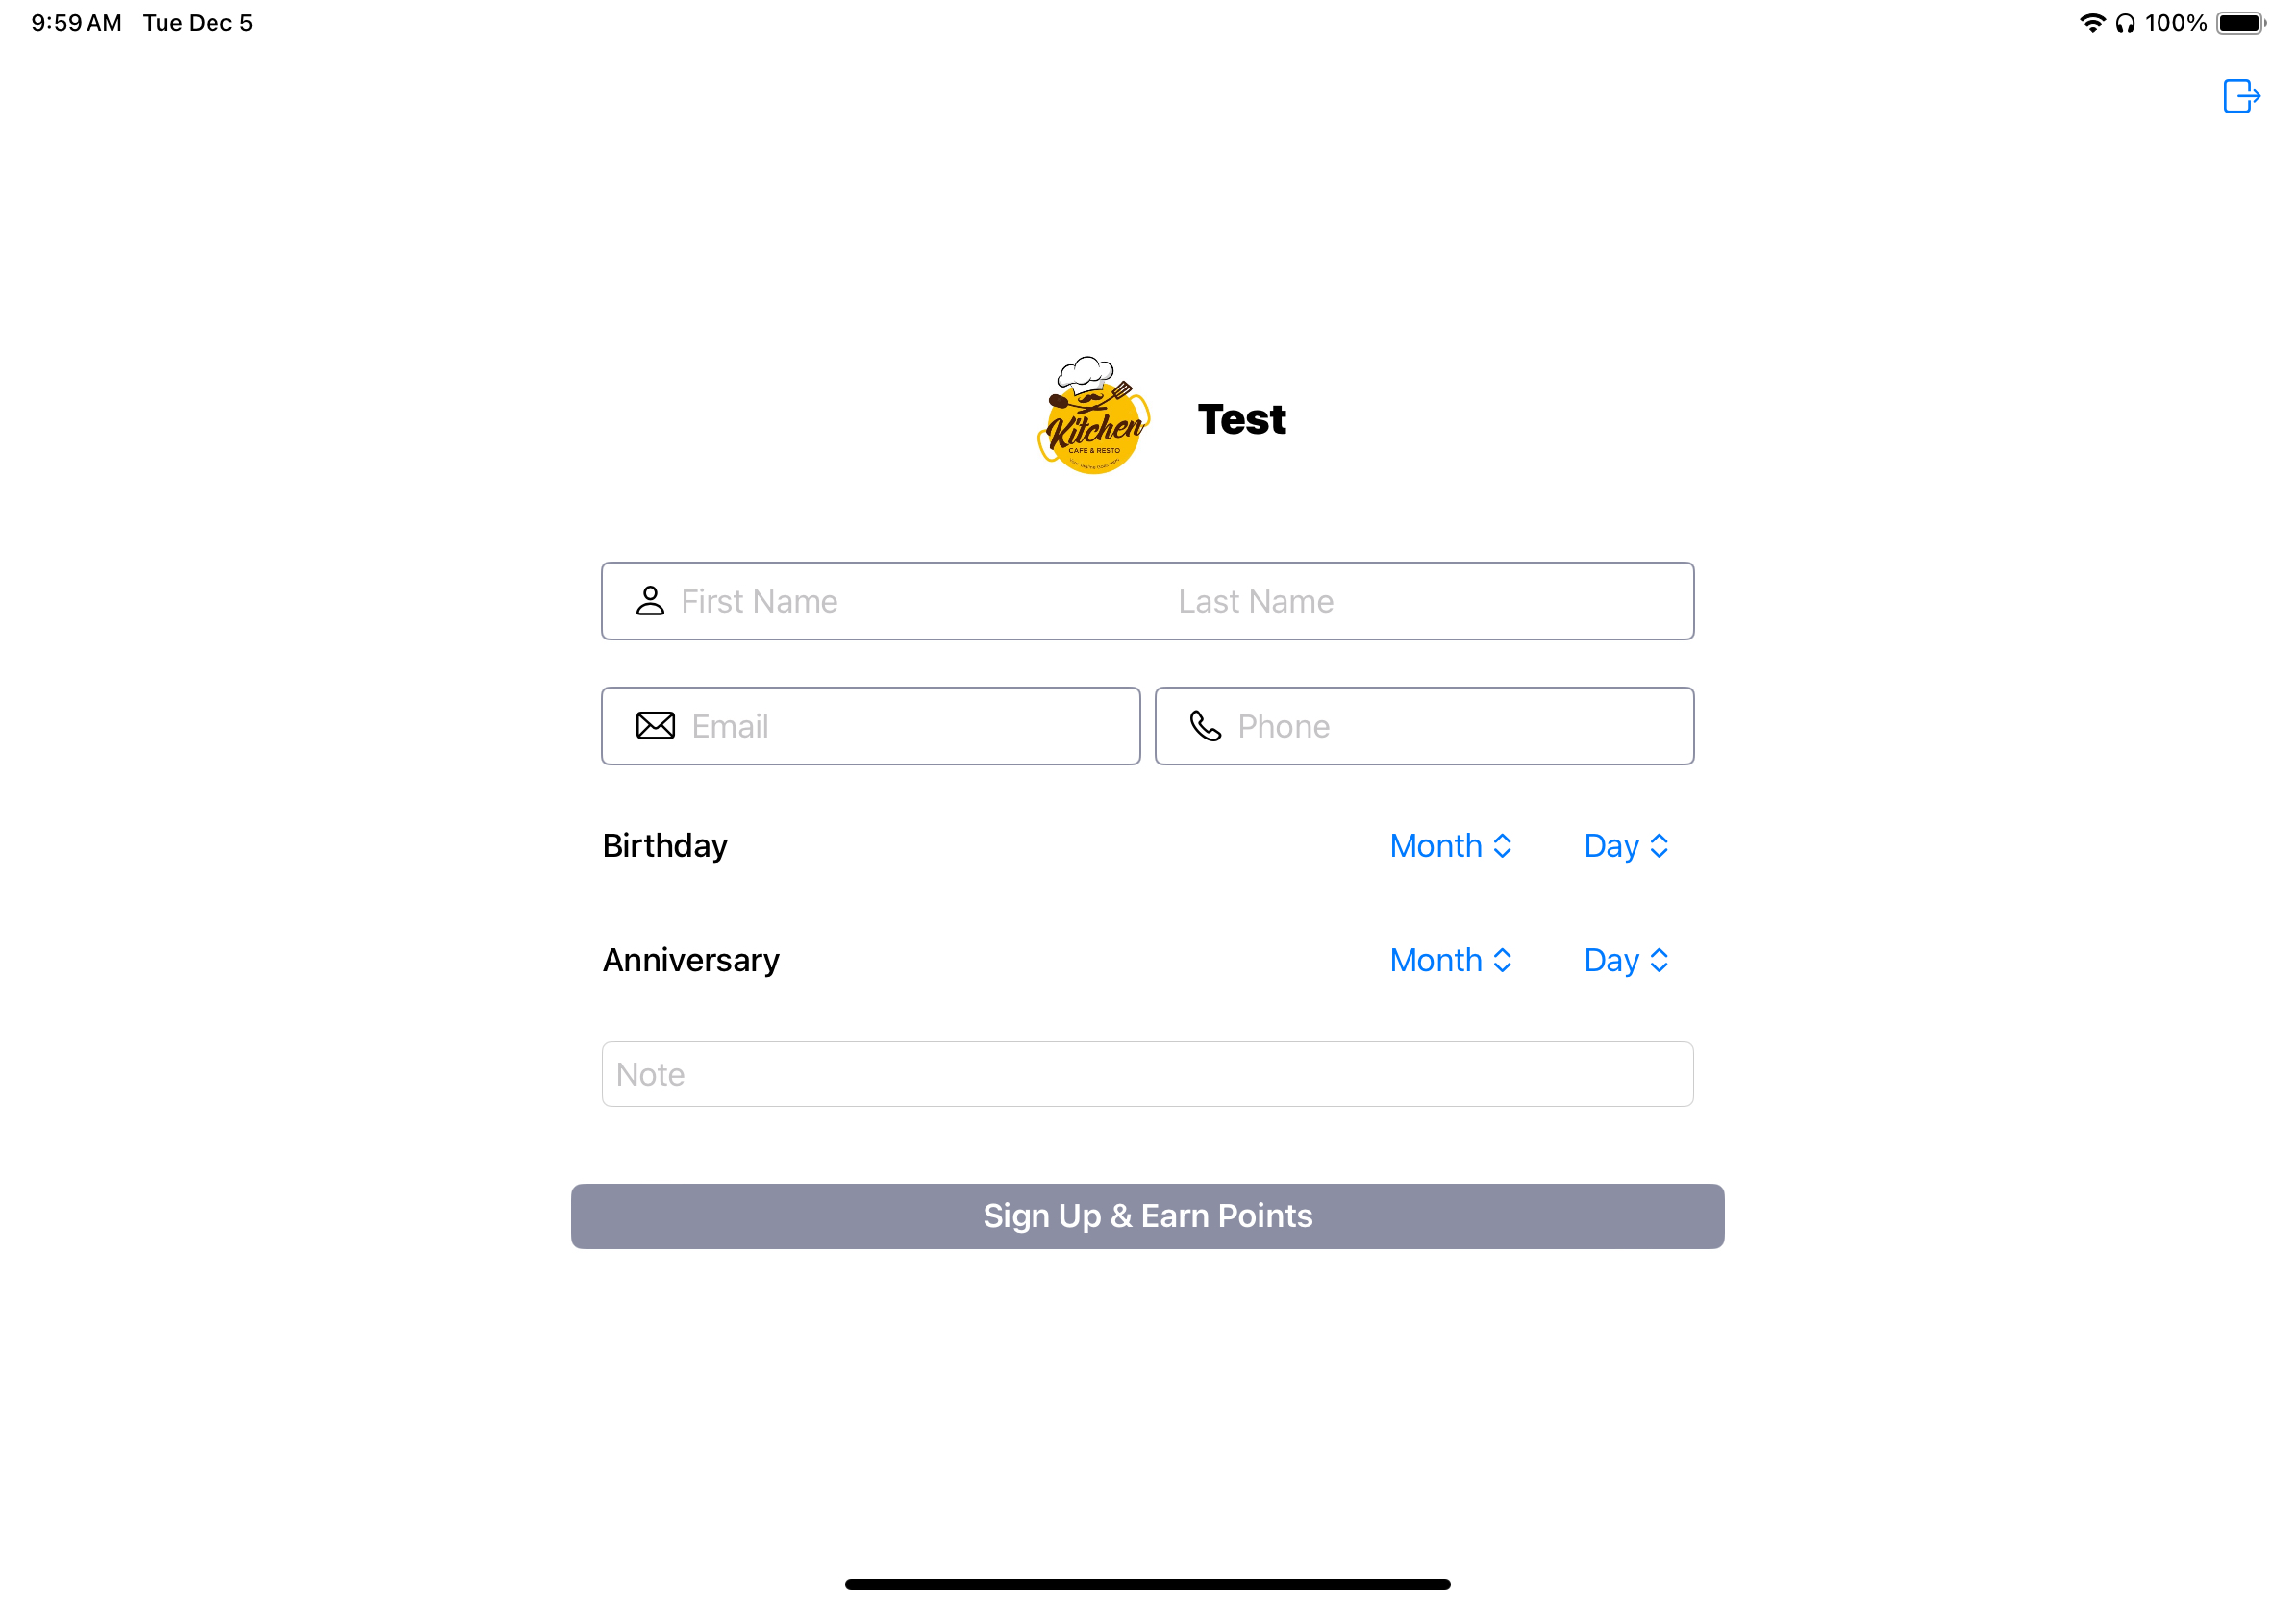
When the Member Program is on, the welcome side asks the customer to “Enter your phone number and collect points.” If your program counts visits, it says “collect visits” instead. The customer types a 10-digit phone number on the keypad.
- If the number belongs to a member, the display shows their name and an
Applybutton. TappingApplyadds the member to the order on the screen.Applydoesn’t show when the order already has a member.- If the order is saved, the POS shows
Added Customer Infoand the member’s name. If the POS finds the order already has a member, it showsNot Allowed: “Order has an attached member. Please edit it from the POS side if needed.” Change the member on the POS instead. See Member. - If the order isn’t saved yet, the member’s number and name go onto the order in Make Order with no message, replacing the customer already there.
- If no message shows on a saved order, the POS couldn’t reach Selflane. Check the connection and add the member on the POS.
- If the order is saved, the POS shows
- If no member has that number, a sign-up form opens. When the customer saves it, the display shows “Thank you for signing up!”
- If the keypad sits idle for about 30 seconds, it clears.
- Once the order has a member, the display greets them by name.
To hide sign-up on the display, turn off Use sign up in front-facing display in the Back Office POS settings.
Tips and signatures
After a Stripe or credit card payment with no tip, the POS sends the payment to the display and shows “Sent to Front Face Display for Tip Adjustment.” The customer then sees the tip screen:
- The screen shows
SubtotalandGratuity, starting at your default tip rate. - The customer taps
No Tip, a suggested amount, drags the slider, or tapsCustomto type an amount. - The customer signs and taps
Submit. A signature is optional. The display shows “Thank You!”
The POS adjusts the tip on that payment and shows Tip Adjusted with the amount. If the customer taps Close instead, the POS records a $0.00 tip.
The POS doesn’t send the tip screen when:
Show Rotating Tip Editoris on for the POS iPad. The POS shows its own tip screen instead. See Settings.- The customer already chose a tip, or declined one, on the payment terminal.
If Use front-display tip screen is off in the Back Office, the POS still says the payment was sent, but the display clears the order instead of asking for a tip.
To send a card payment to the display again, tap FF next to the payment in the order’s payment list. On iPhone, touch and hold the payment, then tap Send to Front Display. Kiosk orders don’t offer this.
Tip settings in the Back Office
Set these under Gratuity in the Back Office POS settings:
Use front-display tip screen- turn the tip screen on the display on or off.Default tip rate- the tip the screen starts with.Suggested choices- the percentages shown as buttons.Dollar tip threshold- for orders below this amount, the screen offers $1, $2, $3, 10%, 15%, and 20% instead of your suggested choices. Set it to $0 to always use percentages.
To print a receipt each time the customer finishes the tip screen, choose which copies to print in Print when tip adjusted on the front-facing display in the Back Office receipt settings.
Customer-Facing Display demo mode
In Selflane POS 7.6.0 or later, a business that hasn’t subscribed to the Customer-Facing Display can try it for 3 minutes. The bottom bar shows 3' Demo Mode. When the time runs out, the display stops showing orders and tips and offers Subscribe to Front Display Module. Tap Pricing in Display Hub to see plans.
Loyalty Program Display
Loyalty Program Display: Gives the customer the ability to sign up for the Member Program.
Drive-Thru Display
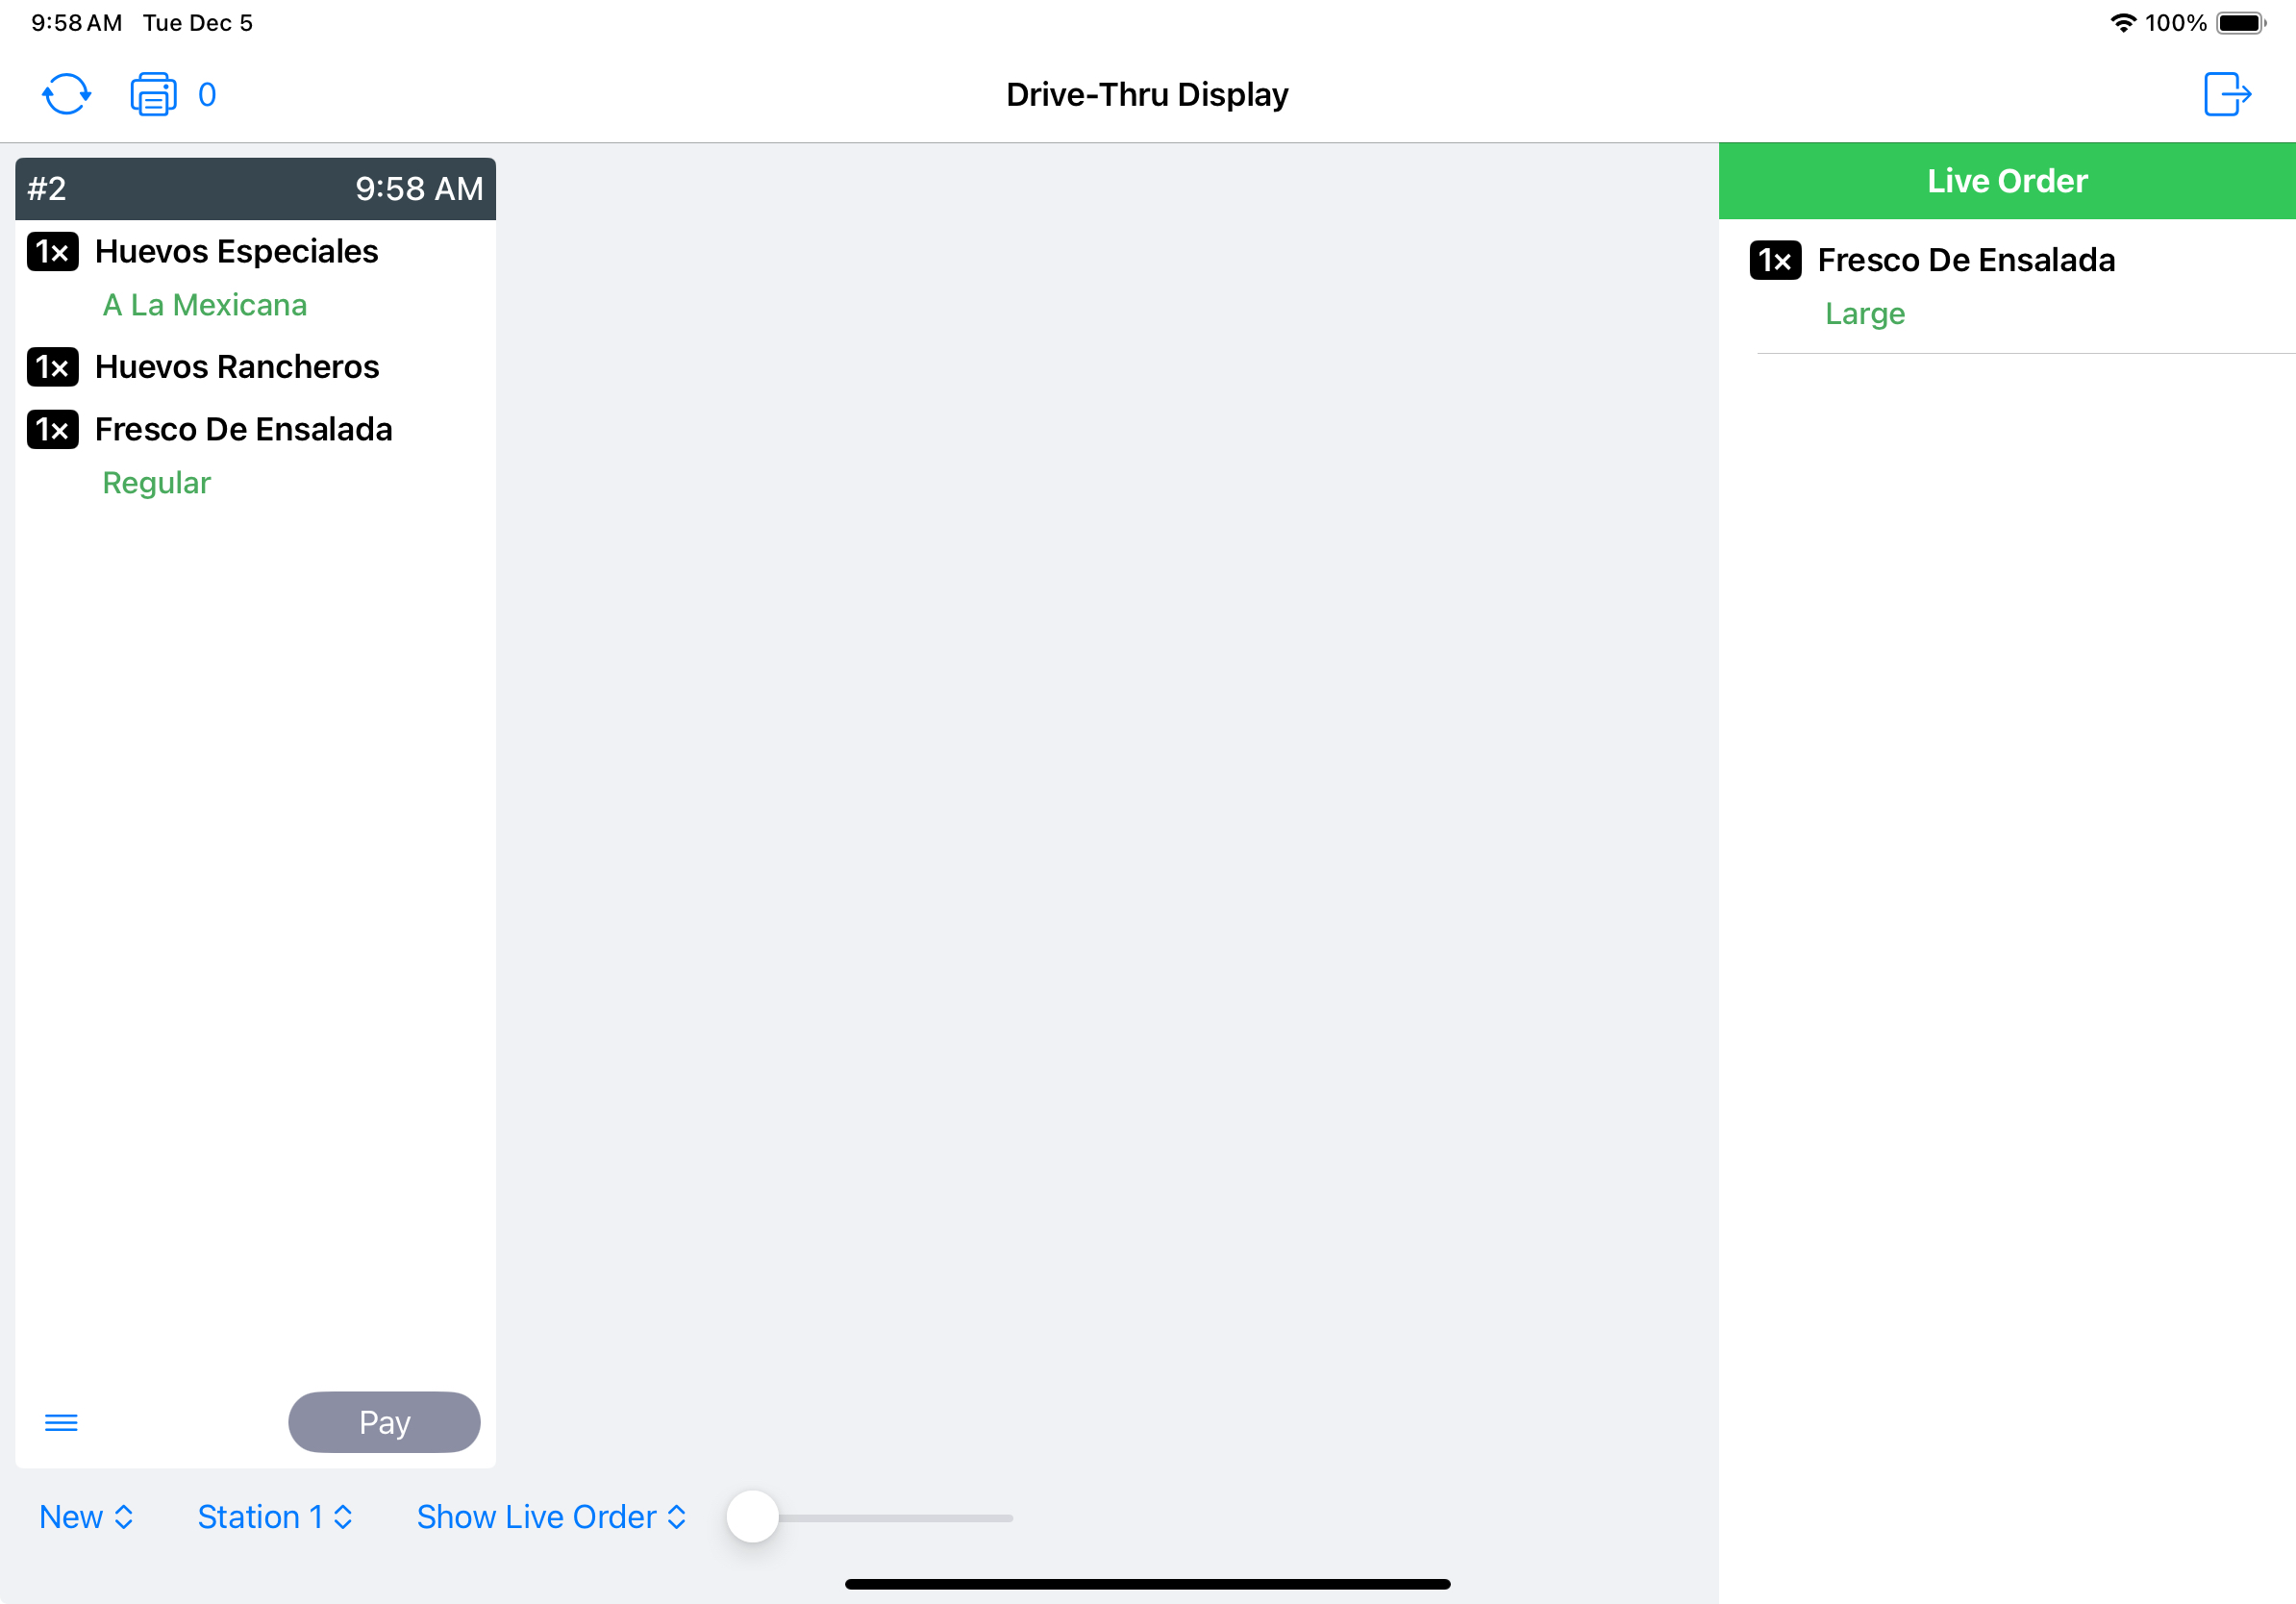
Use the Drive-Thru Display to split the drive-thru between two staff stations. One person takes the order at the speaker, and a second iPad at the window shows each car’s order so staff there can collect payment and hand it out.
What you need
- The Drive-Thru Module on your Selflane plan. Without it, the display runs in demo mode. In Selflane POS 7.9.2 or later, you can still take drive-thru orders in Drive-Thru Mode. Outside that mode,
Drive Thrudoesn’t appear in the order-type selector. - One iPad that takes orders and one iPad for the Drive-Thru Display.
- The same
Stationnumber on both iPads. The station is the lane: the display shows only orders taken on an iPad with the same station. For one lane, use1on both. - The same
Peer Comm. Channelon both iPads, if you want the display to show the order while it’s being entered.
Set Station and Peer Comm. Channel in More > Display Hub on each iPad.
Take drive-thru orders
On the iPad at the speaker:
- Tap
More>Settings, turn onQuick Service Mode, then turn onDrive-Thru Mode. - Start an order. In Drive-Thru Mode, every new order starts as
Drive Thruand opens straight to the menu. - In the order header, record the car so the window can match it: tap
MaleorFemale, a body style, and a color. These are optional. - Add the items and send the order.
In Drive-Thru Mode, the POS stays on Make Order after you tap Send, ready for the next car. If a Customer-Facing Display is connected, it shows the order you just sent.
Drive-Thru Mode requires Quick Service Mode. In Selflane POS 7.9.2 or later, it doesn’t need the Drive-Thru Module, so you can take drive-thru orders without the display. In 7.9.1, it also requires the Drive-Thru Module. In 7.9.1 or later, it also sets the first untouched order after opening the app to Drive Thru once the business settings load. An order you’ve already started or given another type stays as you set it.
Without Drive-Thru Mode, Drive Thru is the last choice in the order-type selector if your plan includes the Drive-Thru Module. Tap it to make a single drive-thru order.
Kitchen tickets for these orders print Drive Thru.
Open the display
- On the iPad at the window, tap
More>Display Hub. - Tap
Drive-Thru Display.
The title shows the lane, such as Lane 1, or All Lanes. While the display is open, the iPad screen stays on.
Read an order card
Each of today’s Drive-Thru orders for this lane is a card. Swipe sideways to see more cards.
The top of the card shows:
- The order number and ready time. The bar turns black when the order is closed.
- The car color and body style, if both were entered, and
MorFif a gender was entered. - The order note, in red.
Below that, each item shows its quantity, kitchen name, modifiers in green, and the name entered for the item, if any. A brown item name means more than one of that item. A purple bar on the left marks an item that’s part of a combo. Gift cards and vouchers on the order are listed after the items.
Live Order
The Live Order panel on the right shows the order being entered, as it’s built, on any iPad on the same Peer Comm. Channel. It clears when that order is sent, and the new card appears.
In Selflane POS 7.9.1 or later, it also clears when the order-taking iPad empties its cart without sending the order. Update both iPads to use this behavior.
The panel needs both iPads on the same Peer Comm. Channel. Tap Hide Live to make room for more cards, or Show Live to bring it back.
Take payment
Tap Pay on the card to open the payment screen for that order. If the order has split checks, you pay each check from the split check screen. For how payment works, see Pay Order.
Card payments taken here don’t send the tip prompt to a Customer-Facing Display or open the rotating tip editor on this iPad.
Tap the menu icon on the card for more actions:
Print Customer Receipt.Print to Kitchen- send the order to the kitchen printers again.Add Item- open the menu to add items to this order.Delete Item- void items. Staff without a manager role need a manager’s approval. See Void Item.Edit Payment- open the payment screen, the same asPay.
Drive-Thru controls
Below the cards:
NeworPaid- show unpaid orders, earliest ready time first, or paid orders, latest first. Each shows a count.- Width slider - change the card width.
Show LiveorHide Live- show or hide the Live Order panel.
Selflane POS 7.9.1 corrects the extra 20 that earlier versions added after the Paid count.
In the top bar:
- Sync icon - reload today’s orders.
- Printer icon - open the print queue. See Check the print queue.
- Gear icon - open
Drive Thru Settingsand choose a lane, 1 to 20, inShow Lane. This also changes this iPad’sStationin Display Hub.All Lanesis offered only while the iPad’s station is still unset, so once you pick a lane you can’t switch back. - Exit icon (top right) - tap it, then
Exit Drive-Thru Displayto return to the POS.
When there are no orders to show, the display says “No Orders to Display”.
While the display is open, the iPad doesn’t auto-print online orders or play the new-order sound.
Drive-Thru demo mode
A business without the Drive-Thru Module sees (Demo) in the title. After 2 minutes, the demo is replaced by Subscribe to the Drive-Thru Module. Tap Pricing in Display Hub to see plans.
Drive-Thru service ended
In Selflane POS 7.5.9 or later, if Selflane has ended your Drive-Thru service, the display shows Service Ended with “Drive-Thru Display has ended. Contact Selflane to resume.” Tap Exit to return to the POS.
If something goes wrong
- An order doesn’t show on the display. Check that the order-taking iPad’s
Stationmatches the lane inShow Lane, and that the order type isDrive Thru. CheckNewandPaid, then tap the sync icon. - The Live Order panel stays blank. Set both iPads to the same
Peer Comm. Channelin Display Hub, and check thatShow Liveis on.