Basic Settings
The Basic Settings page is the central hub for configuring your business. All settings are organized into cards on a single scrollable page. Each card displays current values at a glance — click Edit to open a form, make your changes, and click Save.
Basic Profile
The Basic Profile card contains your core business details.
- Click Edit in the Basic Profile area.
- Choose the price range that best represents your business.
- Enter your business website (must follow
https://format). - Select the appropriate place type. If it’s a Food and Drink establishment, you can also specify categories.
- Provide a description of your business — this is what customers see about your establishment.
- Click Save.
Logo
Upload a logo from the computer you are using.
- Click the business logo box to the left of your business name.
- Browse for the image file and select it.
- Click Open to upload.
Address
The Address card shows your business location, timezone, and Google Place ID.
- Click Edit in the Address area.
- Update your address as needed. The timezone is displayed in a friendly format (e.g., “Pacific Standard Time”).
- Click Save.
Phone Number
Your business phone number is shown to customers and used for the auto-call feature on online orders ($0.10 per call).
- Click Edit in the Phone Number area.
- Update the phone number.
- Toggle Call on Online Orders on or off as needed.
- Click Save.
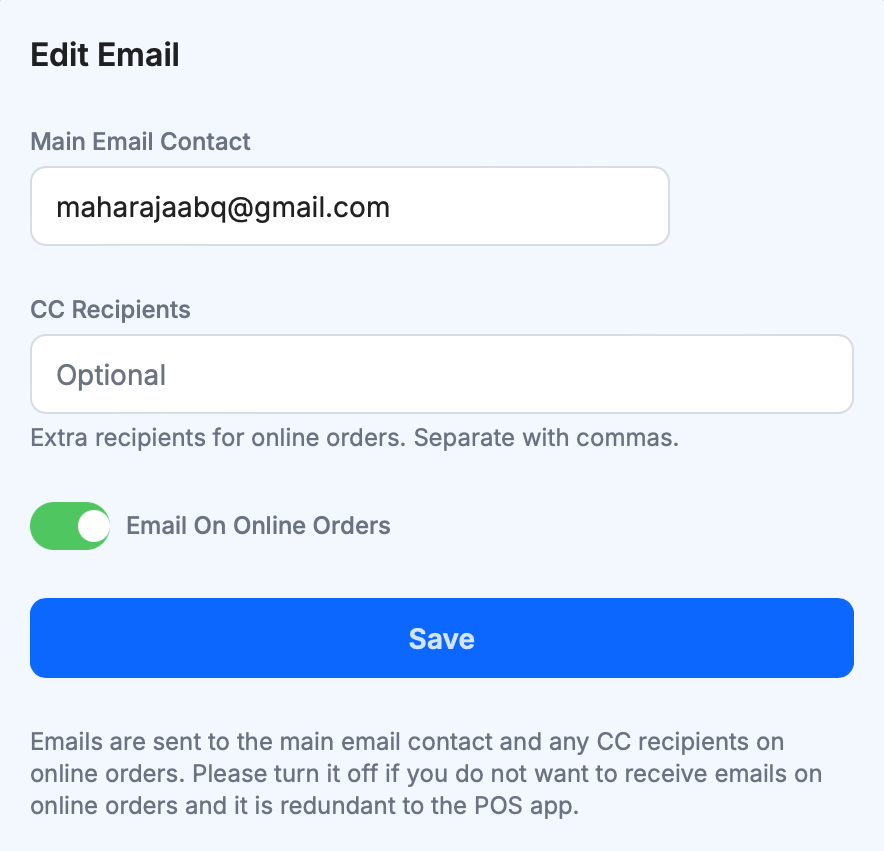
Email Address
Set up a primary email address and multiple CC recipients. Business emails receive notifications for online orders, reservations, and other activity.
- Click Edit in the Email area.
- Enter the primary email address.
- Add CC recipients — each appears as a removable chip.
- Click Save.
There is no cost for the email service or adding CC recipients. Important announcements about online ordering systems are sent to all primary email addresses regardless of notification settings.
Turn Off Email Notification
If your business receives a high volume of online orders, you can turn off email notifications to avoid inbox overload.
If you turn off notifications, always update your business hours promptly for holidays and special occasions. You don’t want customers placing orders when no one is working.
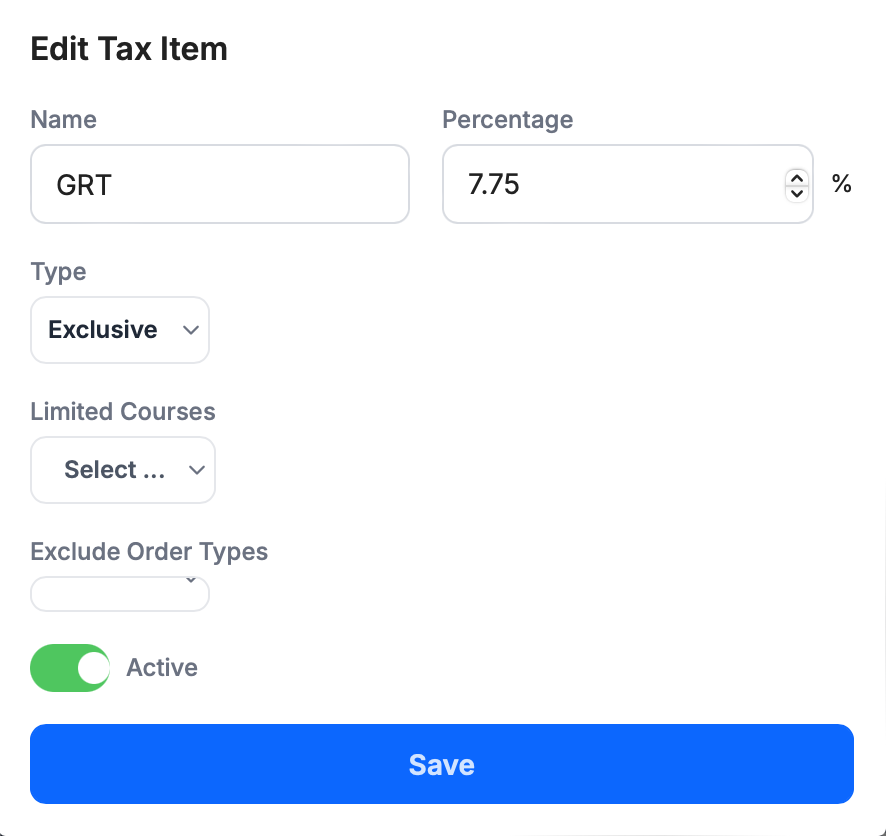
Tax Rates
Define one or more tax rates to apply to orders. Tax rate cards can be drag-and-dropped to reorder them — the order is reflected on printed receipts.
Click the + button to add a new tax rate, or click Edit on an existing one.
- Name — e.g., “Sales Tax”, “County Tax”, “Alcohol Tax”
- Percentage — between 0 and 100
- Courses — (optional) select specific courses this tax applies to. Leave blank to apply to all.
- Type — Exclusive or Inclusive (see below)
- Status — toggle off for temporary tax rates
If a course has specific tax rates attached, other general taxes won’t be applied to it.
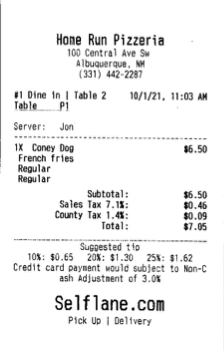
Inclusive vs. Exclusive Tax
An exclusive tax is added on top of the subtotal. An inclusive tax is already included in the menu price.
| Tax Rate | Type | Subtotal | Tax Due | Total |
|---|---|---|---|---|
| 25% | Exclusive | $5.00 | $1.25 | $6.25 ($5.00 + $1.25) |
| 25% | Inclusive | $5.00 | $1.00 (already included in the total) | $5.00 ($4.00 + $1.00) |
Itemized Taxes on Receipts
Sort your tax rates in the desired order and they will appear itemized on the printed receipt.
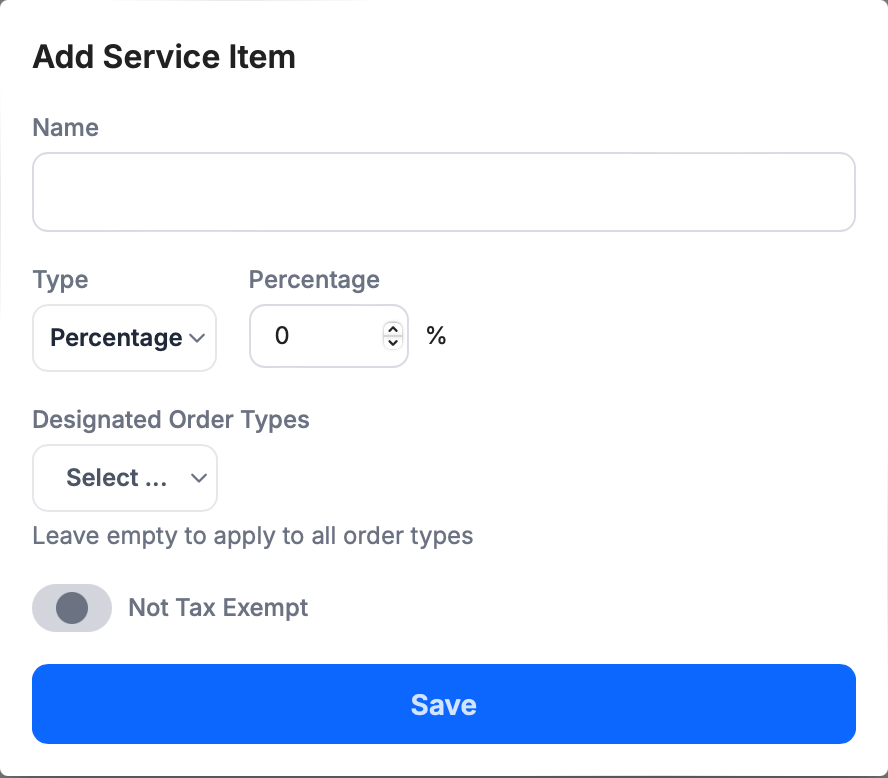
Service Items
A Service Item is a charge automatically attached to all qualified orders. It can be a percentage of the subtotal (pre-tax) or a fixed amount (e.g., a utensil fee for to-go orders).
Service item cards support drag-and-drop reordering, just like tax rates.
Online Ordering
Configure the types of online orders your business accepts.
- Click Edit in the Online Ordering box.
- Enable the order types you want to offer — pickup, curbside pickup, delivery, gift card, and more.
- Set the wait time for each order type.
- Optionally enable tips for online orders.
- If your business exclusively serves members, enable Limited Access and add the Access ID title and a note explaining the requirement.
- Click Save.
Links
The Online Settings section also displays direct links to your online store, catering page, booking page, and member signup page. Share these with customers for easy access.
Catering
Control how catering orders are handled. Any order with a subtotal (before tip and tax) above the effective purchase value is automatically categorized as a catering order, ensuring large orders include enough lead time.
- Click Edit in the Catering box.
- Toggle catering on or off with the Status checkbox.
- Configure the settings:
- Minimum Purchase — the minimum order amount for catering
- Effective Purchase — the threshold above which orders become catering orders
- Lead Time — choose days or hours
- Cutoff Hour — the latest time of day to accept catering orders
- Ahead Up To — maximum number of days in advance customers can place a catering order
- Click Save.
Scan to Order
Scan to Order (QR Code Ordering) lets customers order by scanning a QR code at your location. This feature supports both quick-service and full-service workflows:
- Quick service — use a single generic QR code for all customers. Payment is required when the order is created.
- Full service — use a QR code for each table. Customers can keep adding items until they are ready to pay (via phone or at the register).
Settings include enabling/disabling the feature, payment mode, table selection, tip options, and proximity requirements.
You can also download table QR codes as a PDF for printing and placing on tables.
This feature requires a subscribed Essential Plan or above.
Create a Test Order
Click Create a Test Order to send a test online order through the system. This verifies that app notifications and printing work as expected.
A test order creates a real order in the system. Be aware of side effects such as notifications and receipts printing.